Tuesday, July 28, 2015

Healthy Zucchini Banana Spice Muffins (gluten free, vegan and refined sugar free)


I was craving something cake-like, but I didn’t really want cake. I wanted a nice, moist muffin. And I had zucchini. I thought maybe I could hit my craving where it counts and still have something healthy. These are a bit like a dense, moist, spice cake and really knocked my cravings out of the park.

Ingredients (makes 9 muffins):
2 pitted Medjool dates
1 Tablespoon ground flax seed
1/3 cup warm water
½ cup natural applesauce
1 ripe banana, mashed
¼ cup coconut oil, softened but not liquefied
1 cup brown rice flour
1/2 cup coconut flour
1 teaspoon baking soda
¼ teaspoon baking powder
1 teaspoon cinnamon
A good few gratings of fresh nutmeg
2 cups grated zucchini

Directions:
Preheat oven to 350 degrees F. Line 9 cups of a regular sized 12 cup muffin tin with parchment cupcake liners and set aside.

In a Nutri Bullet, Ninja processor or just a good, strong regular blender, combined the dates, flax seed and warm water. Pulse until you get a thin paste.

In a large mixing bowl, using electric beaters (or a stand mixer with the paddle attachment-which is what I used), combine the date mixture, applesauce, banana and coconut oil. Mix on medium until thoroughly combined. Add the flours, baking soda, baking powder, cinnamon and nutmeg to the bowl and mix thoroughly. Throw the zucchini in and give it another go.

Divide the muffin batter evenly between your 9 lined muffin cups and bake for 20-25 minutes or until a toothpick comes out clean. Let cool slightly and enjoy a lovely, warm treat.


Sunday, July 26, 2015

Crispy Cheddar and Bacon Wafers


Cheese wafers were a standard appetizer at any ‘60s or ‘70s soiree be it a hip cocktail party or a baby shower. The problem was they could be bland and/or too dry and crumbly. I wanted to amp up the flavor a little, add a binder (the egg) and play with the flours to see if I could make them gluten free and less dense than the traditional.  These are so incredibly good! I was thrilled with the nutty flavor from the almond meal along with the tangy flavor. Yeah, these rock.

Ingredients:
½ cup butter or margarine, softened
1 egg
½ teaspoon salt
Pinch of dry mustard
½ to 1 teaspoon hot sauce (I like Frank’s®)
¾ cup rice flour
¼ cup almond meal
1 cup shredded sharp cheddar cheese
¼ cup shredded parmesan cheese
3 or 4 strips cooked bacon, crumbled
2 cups crisp rice cereal (like Rice Krispies®), slightly crushed

Directions:
Preheat oven to 350 degrees F. Line two baking sheets with parchment and set aside.

In a large mixing bowl, cream the butter with an electric mixer/on a stand mixer. Add the egg, salt, dry mustard and hot sauce. Mix until thoroughly combined. Add in the rice flour and almond meal. Mix until thoroughly combined into soft dough.

Fold in the cheeses, the bacon and then the cereal. Honestly, it is easier to do this part with your hands. Roll into balls and place about 2 inches apart on the baking sheet.

Spray the bottom of a drinking glass with cooking spray and use the bottom to press down on each wafer.

Bake for 15 to 18 minutes or until the edges are golden. Remove to a wire rack with paper towels underneath and let cool completely—they crisp up as they cool. Store in an airtight container.


Friday, July 24, 2015

Ultimate summer sandwich-a re-imagined BLT (Cucumber, watermelon, bacon, goat cheese, and watercress with lemon mayo)


This sandwich is incredibly refreshing and so complex. I love getting a bite of watermelon next to fresh cucumbers and bacon and well, everything! It’s kind of sweet, kind of savory, kind of nutty from the sprouted grain bread, and very, very fresh.

This looks like a huge, messy sandwich and it is, my friends, it is. It’s perfect for eating and then jumping into the sprinkler to wash off.

Ingredients (serves 2):

4 slices sprouted grain bread, toasted

Lemon mayo:
¼ cup mayonnaise
2 teaspoons fresh lemon juice

4 thin slices of watermelon
4 thin slices of goat cheese (since goat cheese doesn’t ‘slice’ very well, just do your best)
4 thin slices of cucumber (halve the cuke and then cut lengthwise slices)
4 slices cooked bacon
4 thin slices of tomato
Seasoned salt, optional and to taste
1 bunch fresh watercress

Directions:
Couldn’t be simpler. For the spread, mix the mayonnaise and lemon juice together.

Coat one side of each toasted bread slice with the lemon mayo.

On 2 of the slices, lay down 2 slices of watermelon, 2 slices of goat cheese, 2 slices of cucumber (sensing a pattern here?), a light sprinkle of seasoned salt (if using), 2 slices of bacon, 2 slices of tomato, seasoned salt, a bit of the watercress and then top with another slice of toast, spread side down. Cut in half and enjoy.


Tuesday, July 21, 2015

Crackle-Top Brownies


These lovely, dark, dense brownies have a crackly crust that is so simple to do. Almost like ‘Brownies Brulee’.

Ingredients (makes one 13x9 pan):
1 cup butter (2 sticks)
1 cup chocolate chips (I used 60% cocoa chips)
1 ¼ cups granulated sugar for the batter plus 1/3 cup for the top
4 large eggs, lightly beaten
1 teaspoon vanilla
1 cup all purpose flour
¼ cup unsweetened cocoa powder
½ teaspoon espresso powder

Directions:
Pre heat oven to 325 degrees F. Butter and flour a 13 x 9 baking pan.

In a large saucepan, melt the butter and chocolate chips together.

Remove from heat and stir in the 1 ¼ cups of sugar. Then, stir in the eggs and vanilla, mixing until completely smooth.

Stir in the flour, cocoa powder and espresso powder. Pour into the prepared pan. Evenly sprinkle the 1/3 cup sugar over the top.


Bake until a toothpick comes out relatively clean (these are very moist brownies), about 35 minutes. Let cool and then cut into squares. 

Friday, July 10, 2015

Wine Braised Short Ribs


I think short ribs are one of the most over looked cuts of beef. They are affordable (especially if you grab them on sale, like I did today) and have a luscious, rich flavor when slow cooked. This may seem like a fancy dish, but trust me, it is really easy, requires very few ingredients/pans and there is minimal effort involved.

Try these over True Grits— it’s a phenomenal combination.

Ingredients (serves 4):
8 small or 4 to 6 large beef short ribs (mine are small, around 3 inches long by 2 inches wide, so I used 8)
Salt and pepper
2 Tablespoons canola oil
1 (6 ounce) can tomato paste
2 teaspoons dried thyme
2 cups hearty red wine (like Pinot Noir)
2 cups beef broth
1 teaspoon salt (more if your broth is unsalted)
Freshly cracked black pepper-your call on the amount

Directions:
Cut the beef ribs into individual bones. Liberally salt and pepper all sides of each rib (if you do this on a piece of wax paper, it is really easy to turn the ribs to coat all sides, even the ends). Let sit for 15 to 30 minutes. This lets the salt really work magic on the meat.

Heat the oil in a 5 quart Dutch oven over medium heat. Place the ribs in the oil and brown them off-about 5 minutes per side, turning just a few times so they get nicely crusted. If you have large ribs, you may want to do two batches, so you don’t crowd the pan.

While the ribs are browning, make sure you have a large space in your oven and preheat it to 350 degrees F.

Combine the tomato paste, thyme, wine, broth, salt and pepper in a medium mixing bowl.

When the ribs are browned, pour the wine mixture over them and gently stir so that the ribs are nestled down into the sauce. The liquid should come just to the top of ribs. If not, add a few more glugs of wine. Or broth. But really, wine.

Bring to a boil and then remove the Dutch oven from heat. Cover it and place in the oven for 1 ½ hours. Then, uncover and cook for another 30 minutes to finish cooking and reduce the sauce. If there is oil sitting on the top of the dish that you don’t like, just use a few paper towels to it up.

Serve over mashed potatoes, cheese grits, polenta or quinoa. Garnish with a few sprigs of fresh thyme.


Friday, July 3, 2015

Chocolate Espresso Caramel Pie

(A pie for Jenny)

Deep, dark and decadent, this pie has a rich crust followed by a layer of silky caramel. The next layer is a cross between chocolate mousse and chocolate truffles. I love how the espresso is subtle but makes its presence known in this not-too-sweet pie.


Ingredients (makes one 9 inch pie):
Crust:
30 chocolate wafers (such as Nabisco® Famous Wafers)
1 teaspoon espresso powder
4 Tablespoons butter (1/2 stick), melted

Caramel layer:
1/4 cup water
1 cup granulated sugar
1/4 cup light corn syrup
4 tablespoons (1/2 stick) unsalted butter, cut into pieces
1/4 cup heavy cream
1 pinch of coarse salt
1/2 teaspoon vanilla

Chocolate espresso layer:
1¼ cups heavy cream
1 envelope (2 teaspoons) unflavored gelatin
2 teaspoons instant espresso powder
Pinch of salt
1 cup 60% chocolate chips (like Ghirardelli®)
4 tablespoons unsalted butter, softened

Directions:
Make the crust first: Preheat the oven to 350 degrees F. Process the chocolate wafers and the espresso powder in a food processor until about pea size. Stop and drizzle in the melted butter. Pulse until the crumbs are like damp sand. Pour crumb mixture into a 9-inch pie plate and, using the bottom of a spoon or your fingers, press firmly and evenly into the bottom and up the sides of the pan. Bake 12 minutes and remove to a wire rack to cool completely before adding in the caramel layer. You can turn the oven off at this point-you won’t need it any more.

For the caramel layer:
Place the water in a large saucepan. Add sugar and corn syrup, and cook mixture over medium-high heat, swirling the pan occasionally, until it becomes a dark-amber caramel, about 10 minutes. Remove the pan from the heat and carefully whisk in butter, cream, pinch of salt and vanilla. Please be careful here-the butter, the cream and the vanilla will all foam up as you add them. That’s fine, it subsides. However, the hot caramel will cause the worst burns if it touches your skin, so just be careful, ok?

Pour the caramel into the crust and swirl the dish to let the caramel spread evenly all along the bottom. Let stand until the caramel is set, at least 45 minutes.

For the chocolate espresso layer:
Pour cream into a medium saucepan. Sprinkle gelatin over cream and let stand one minute. Heat on medium low for about 5 minutes, stirring constantly, until gelatin dissolves. Add espresso powder and salt and bring to a simmer, stirring to dissolve espresso powder and salt. Place chocolate in a medium heat proof bowl. Pour the simmering cream mixture over chocolate, cover, and let stand for 5 minutes to allow chocolate to soften. Using whisk, stir mixture slowly and gently until smooth. Add butter. Continue to whisk gently until fully incorporated. Pour filling over the caramel layer in the pie pan and tilt gently to make sure it covers the caramel layer. Refrigerate for at least 3 hours or until set to the touch.

Two Layer Peanut Butter and Banana Cream Pie

(A pie for Crystal)

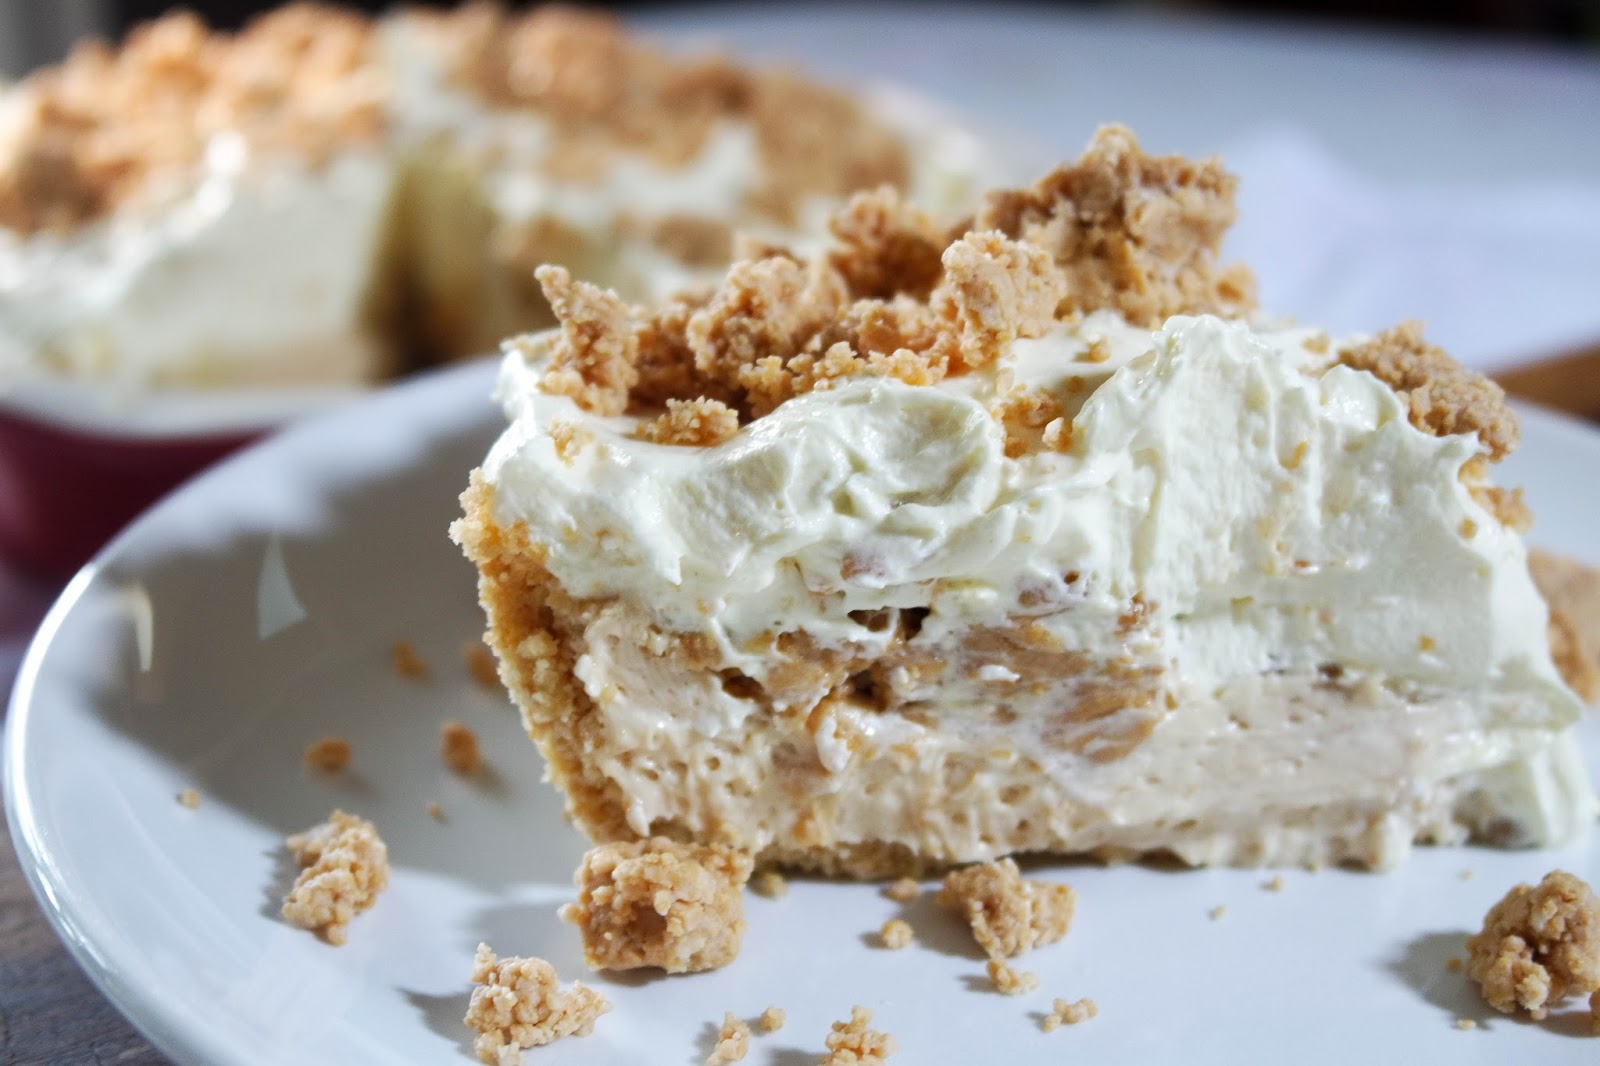
Peanut butter and bananas are one of those food combinations that are just perfect. This pie has a light and fluffy peanut butter layer followed by fresh bananas and peanut butter crumbles (these alone are worth making the pie!!) and a creamy banana layer. This recipe makes one big and deep pie, so if you find you don’t have a deep pie dish, you can either cut the whipped topping in the peanut butter layer by half or spoon any extra of either or both fillings into a bowl or ramekin for a little treat for the cook. Late at night…spoon in hand and the fridge door open. Yeah.

Ingredients: (makes one [9 inch, deep dish] pie):

Crust:
40 vanilla wafers
1 Tablespoon granulated sugar
4 Tablespoons (1/2 stick) butter, melted

Peanut butter crumbles:
½ cup creamy peanut butter
1 cup confectioner’s sugar

Peanut butter cream layer:
1 (8 ounce) package cream cheese, softened
1/2 cup peanut butter
1 teaspoon vanilla
½ cup confectioner’s sugar
1 (8 ounce) container frozen whipped topping, thawed

Banana cream layer:
1 medium banana, sliced
1 cup cold milk
½ teaspoon vanilla
1 small (0.9 ounce) package instant banana pudding
1 (8 ounce) container frozen whipped topping, thawed

Directions:
Preheat oven to 350 degrees F.  

For the crust: Toss the vanilla wafers and sugar into the food processor and process until coarse crumbs form. Drizzle the melted butter over and continue to process until the mixture is like damp sand. Pour the crumbs into a deep 9 inch pie plate that has been sprayed with cooking spray and use your fingers or the back of a spoon to press the crumbs over the bottom and sides of the pan. Bake for 12 minutes or until just lightly golden and remove to a wire rack to cool completely, about 1 hour. You can turn off the oven at this point, you won’t need it anymore.

For the peanut butter crumbles: Combine the ½ cup peanut butter and 1 cup confectioner’s sugar in a bowl and, using a fork, mix until big crumbly pieces form. If your crumbles are on the small side, just pick some up and squish in your first. Then they will form bigger crumbles. It’s also fun to do. Set aside.

For the peanut butter cream layer:
Using an electric mixer, combine the cream cheese, peanut butter and vanilla in a large mixing bowl. Mix until smooth and then, on the lowest speed, add the powdered sugar (because if you do it on high, it will end up all over the kitchen). Mix until thoroughly combined and then gently fold in the whipped topping a big spoonful at a time (it blends easier this way rather than just dumping the whipped topping in all at once). Spoon into your cooled pie shell and refrigerate until you are ready for the next layer-at least 30 minutes is best.

For the banana cream layer: Remove the pie from the fridge and place the banana slices over the peanut butter layer. Sprinkle on ½ of the peanut butter crumbles.

In a large bowl and again using your electric mixer, combine the milk, vanilla and banana pudding mix until smooth. With a spoon, fold in the whipped topping. Pour into the pie pan and spread to the edges of the pie. Refrigerate for at least another hour.


Finishing: When you are ready to serve, remove from the fridge and top with remaining peanut butter crumbles.